
Support & Manuals
Welcome to our Pre-Flight Hanger. Below you will find step-by-step guides for setting up your new gear. Whether you are using our yoke mounts, suction cups, or kneeboards, our goal is to help you get set up quickly so you can focus on what matters most: flying the airplane.
Select your product:
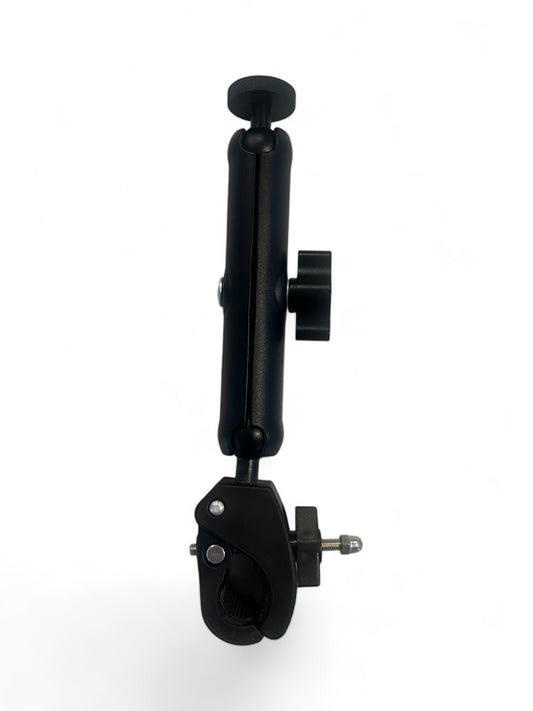
ProAviator Yoke Mount
Thank you for choosing the ProAviator Yoke Mount. Please read these instructions carefully to ensure a secure installation and safe flight operations.
⚠️ CRITICAL SAFETY WARNING
Before operating the aircraft, you must verify that this mount does not interfere with the full range of motion of the flight controls or obstruct the view of essential flight instruments.
Step 1: Assemble the Mount
- Locate the Yoke Arm and the Tablet Holder.
- Align the threaded screw on the Yoke Arm with the receiver on the back of the Tablet Holder.
- Screw the components together securely. Ensure the connection is tight so the holder does not rotate unintentionally, but be careful not to over-tighten if using plastic components.
Step 2: Attach to the Control Yoke
- Loosen the clamp knob on the mount base to open the jaws.
- Position the clamp around the shaft of the aircraft’s control yoke.
- Tighten the clamp knob until the mount is firmly attached to the yoke shaft.Note: The mount should be tight enough that it does not slide or rotate under the weight of the iPad.
Step 3: Verify Safety & Clearance (Crucial)
Before inserting your device, you must perform a control check:
- Full Deflection Check: Move the yoke to its limits in all directions (Full Forward, Full Aft, Full Left, Full Right). Ensure the mount does not hit the panel, your knees, or the windshield.
- Instrument Visibility: Sit in your normal pilot position and ensure the mount does not block your view of the six-pack, engine gauges, or GPS.
- No Interference: Ensure the clamp mechanism does not interfere with any PTT (Push-to-Talk) switches or autopilot disconnect buttons.
Step 4: Mount Your iPad
- Expand the spring-loaded bracket on the Tablet Holder.
- Place your iPad into the holder, ensuring it sits flush against the backplate.
- Gently release the bracket so it grips the corners or edges of the iPad securely.
- Adjust the angle of the arm and the rotation of the holder to achieve your desired viewing angle.
Step 5: Final Pre-Flight
Give the mount one final shake to ensure everything is tight. Confirm your screen brightness is set appropriately for the cockpit environment.
Fly Safe and Enjoy Your Flight!
Disclaimer
The Pilot in Command is solely responsible for ensuring that all cockpit accessories are secured properly and do not interfere with the safe operation of the aircraft.
ProAviator Suction Cup Mount
Thank you for choosing the ProAviator Suction Cup Mount. Please read these instructions carefully to ensure a secure hold and to maintain a clear field of view during flight.
⚠️ CRITICAL SAFETY WARNING
Ensure the mount is placed in a location that does not obstruct your primary visual scan outside the aircraft or interfere with the operation of the aircraft controls.
Step 1: Choose Your Device Setup
This mount is designed for versatility and includes attachments for both tablets and action cameras.
- For Tablets/iPads: Locate the Tablet Holder and the Suction Arm. Align the threaded screw (or ball joint) on the arm with the receiver on the back of the Tablet Holder.
- For Action Cameras (Optional): If you wish to record your flight, locate the included Action Camera Bracket (compatible with GoPro style mounts). Attach this bracket to the Suction Arm instead of the Tablet Holder.
Secure the connection tightly. Ensure the holder or camera bracket does not droop, but leave enough flexibility to adjust the angle later.
Step 2: Prepare the Surface
- Clean the Area: For the strongest hold, clean the area of the window or smooth surface where you intend to attach the mount using a glass cleaner or alcohol wipe.
- Dry Completely: Ensure the surface is completely dry and free of dust or oils before applying the suction cup.Note: Avoid placing the mount over heating elements (defroster lines) or stickers/decals on the window.
Step 3: Attach to the Window
- Ensure the suction lever on the mount base is in the "Up" (Unlocked) position.
- Press the rubber suction cup firmly against the glass to create a seal.
- While maintaining pressure, push the suction lever down to the "Locked" position.
- The Tug Test: Give the mount a firm tug to ensure it is securely adhered to the glass before attaching your device.
Step 4: Verify Safety & Clearance
- Visual Scan: Sit in your normal pilot position. Ensure the mount places the device in your peripheral vision but does not block your view of traffic or the runway environment.
- Control Clearance: Verify that the mount does not interfere with anything or blocking your view.
Step 5: Mount Your Device
- Tablet: Expand the spring-loaded bracket, place your iPad flush against the backplate, and gently release the bracket to grip the device.
- Action Camera: Insert your camera into the prongs of the Action Camera Bracket and secure it with the thumb screw. Ensure the lens is leveled with the horizon.
Step 6: Maintenance
- Re-suction: Suction cups can lose pressure over time due to altitude and temperature changes. We recommend releasing and re-securing the mount before every flight.
Fly Safe and Enjoy Your Flight!
Disclaimer
The Pilot in Command is solely responsible for ensuring that all cockpit accessories are secured properly and do not interfere with the safe operation or visual requirements of the aircraft.
ProAviator Yoke & Suction Cup Mount Set
Thank you for choosing the ProAviator Universal Mount Set. This kit is designed to provide maximum versatility in the cockpit, allowing you to mount your iPad or action camera to either the control yoke or the aircraft window.
⚠️ CRITICAL SAFETY WARNING
Before operating the aircraft, you must verify that the installed mount does not interfere with flight controls, block essential instruments, or obstruct your primary visual scan.
Step 1: Configure Your Setup
Select the components for your current mission:
- Choose Your Base:Yoke Clamp: Best for keeping charts/maps directly in your scan without blocking the window.Suction Cup: Best for side-window mounting or recording flights.
- Choose Your Device Holder:Tablet Holder: For iPads and EFB usage.Action Camera Bracket: For securing cameras (e.g., GoPro) to record your flight.
Step 2: Assembly
- Take your chosen Base (Yoke or Suction) and your chosen Device Holder.
- Align the connection point (ball joint or threaded screw) of the Base with the receiver on the Holder.
- Secure the components together. Tighten the adjustment knob to ensure the holder does not droop, but leave it loose enough to make final angle adjustments once mounted.
Step 3: Installation (Choose A or B)
Option A: Yoke Installation
- Loosen the Clamp: Open the jaws of the Yoke Clamp widely.
- Position: Place the clamp around the shaft of the aircraft’s control yoke.
- Tighten: Secure the clamp knob until the mount is immovable on the shaft.
- CONTROL CHECK (Crucial):Move the yoke to full deflection in all directions (forward, aft, left, right).Ensure the mount does not hit the panel, your knees, or the windshield.Verify it does not block the view of the six-pack or engine gauges.
Option B: Suction Cup Installation
- Prepare Surface: Clean the window area with a glass cleaner or alcohol wipe and ensure it is completely dry.
- Attach: Ensure the lever is "Up" (Unlocked). Press the cup firmly against the glass.
- Lock: Push the lever down to the "Locked" position.
- Tug Test: Give the mount a firm tug to ensure a solid seal.
- VISUAL CHECK: Ensure the mount is positioned in your peripheral vision and does not block your view of traffic or the runway.
Step 4: Mount Your Device
- For Tablets: Expand the spring-loaded bracket, place your device flush against the backplate, and gently release the bracket to grip the corners/edges.
- For Action Cameras: Insert your camera into the prongs of the Action Camera Bracket and secure it with the thumb screw. Level the lens with the horizon.
Step 5: Final Adjustments
- Viewing Angle: Loosen the adjustment knob slightly to rotate the device for the best viewing angle and glare reduction, then re-tighten.
- Tightness Check: Give the entire assembly one final shake to ensure all connections are secure before engine start.
Fly Safe and Enjoy Your Flight!
Disclaimer
The Pilot in Command is solely responsible for ensuring that all cockpit accessories are secured properly and do not interfere with the safe operation or visual requirements of the aircraft.
ProAviator Kneeboard Mount
Thank you for choosing the ProAviator Kneeboard Mount. Please read these instructions carefully to ensure a secure fit and comfortable operation during your flight.
⚠️ CRITICAL SAFETY WARNING
Before flight, verify that the kneeboard does not interfere with the full range of motion of the flight controls (specifically full aft yoke/stick deflection) or obstruct access to the throttle quadrant, flap levers, or gear handle.
Step 1: Assemble the Holder
- Locate the Tablet Holder and the 4-Pin Bracket.
- Align the 4 pins on the bracket with the corresponding slots on the back of the Tablet Holder.
- Lock it in place. Press the bracket in and slide or click it firmly to ensure a secure connection to the holder.
Step 2: Secure to Your Leg
- Sit in your normal pilot position.
- Place the strap assembly on your thigh (left or right leg, depending on preference and cockpit layout).
- Wrap the strap around your leg.
- Pull the strap tight enough to prevent the mount from sliding during turbulence, but loose enough to maintain comfort and circulation.
- Secure the Velcro firmly to lock the strap in place.
Step 3: Mount Your iPad
- Expand the spring-loaded grips on the Tablet Holder.
- Place your iPad into the holder, ensuring it sits flat against the backplate.
- Gently release the grips so they secure the device corners or edges.
- Confirm the screen orientation is correct for your use.
Step 4: Pre-Flight Control Check (Crucial)
Before starting the engine, perform a control sweep:
- Full Aft Check: Pull the yoke or stick fully back (into your lap). Ensure it does not hit the kneeboard or iPad. This is critical for flare and stall recovery safety.
- Side-to-Side: Move the controls full left and right to ensure your arm or the kneeboard doesn't restrict movement.
Fly Safe and Enjoy Your Flight!
Disclaimer
The Pilot in Command is solely responsible for ensuring that all cockpit accessories are secured properly and do not interfere with the safe operation of the aircraft.
Aviator+ Yoke Mount
Thank you for choosing the Aviator+ Yoke Mount. Please read these instructions carefully to ensure a secure installation and safe flight operations.
⚠️ CRITICAL SAFETY WARNING
Before operating the aircraft, you must verify that this mount does not interfere with the full range of motion of the flight controls or obstruct the view of essential flight instruments.
Step 1: Assemble the Mount
- Locate the Yoke Arm and the Tablet Holder.
- Align the threaded screw on the Yoke Arm with the receiver on the back of the Tablet Holder.
- Screw the components together securely. Ensure the connection is tight so the holder does not rotate unintentionally, but be careful not to over-tighten if using plastic components.
Step 2: Attach to the Control Yoke
- Loosen the clamp knob on the mount base to open the jaws.
- Position the clamp around the shaft of the aircraft’s control yoke.
- Tighten the clamp knob until the mount is firmly attached to the yoke shaft. Note: The mount should be tight enough that it does not slide or rotate under the weight of the iPad.
Step 3: Verify Safety & Clearance (Crucial)
Before inserting your device, you must perform a control check:
- Full Deflection Check: Move the yoke to its limits in all directions (Full Forward, Full Aft, Full Left, Full Right). Ensure the mount does not hit the panel, your knees, or the windshield.
- Instrument Visibility: Sit in your normal pilot position and ensure the mount does not block your view of the six-pack, engine gauges, or GPS.
- No Interference: Ensure the clamp mechanism does not interfere with any PTT (Push-to-Talk) switches or autopilot disconnect buttons.
Step 4: Mount Your iPad
- Expand the spring-loaded bracket on the Tablet Holder.
- Place your iPad into the holder, ensuring it sits flush against the backplate.
- Gently release the bracket so it grips the corners or edges of the iPad securely.
- Adjust the angle of the arm and the rotation of the holder to achieve your desired viewing angle.
Step 5: Final Pre-Flight
Give the mount one final shake to ensure everything is tight. Confirm your screen brightness is set appropriately for the cockpit environment.
Fly Safe and Enjoy Your Flight!
Disclaimer
The Pilot in Command is solely responsible for ensuring that all cockpit accessories are secured properly and do not interfere with the safe operation of the aircraft.
Aviator+ Suction Cup Mount
Thank you for choosing the Aviator+ Suction Cup Mount. Please read these instructions carefully to ensure a secure hold and to maintain a clear field of view during flight.
⚠️ CRITICAL SAFETY WARNING
Ensure the mount is placed in a location that does not obstruct your primary visual scan outside the aircraft or interfere with the operation of the aircraft controls.
Step 1: Assemble the Mount
- Locate the Tablet Holder and the Arm. Align the threaded screw on the arm with the receiver on the back of the Tablet Holder. screw the other end to the Suction Cup.
Secure the connection tightly. Ensure the holder bracket does not droop, but leave enough flexibility to adjust the angle later.
Step 2: Prepare the Surface
- Clean the Area: For the strongest hold, clean the area of the window or smooth surface where you intend to attach the mount using a glass cleaner or alcohol wipe.
- Dry Completely: Ensure the surface is completely dry and free of dust or oils before applying the suction cup.Note: Avoid placing the mount over heating elements (defroster lines) or stickers/decals on the window.
Step 3: Attach to the Window
- Ensure the suction lever on the mount base is in the "Open" (Unlocked) position.
- Press the rubber suction cup firmly against the glass to create a seal.
- While maintaining pressure, move the suction lever sideways to the "Locked" position.
- The Tug Test: Give the mount a firm tug to ensure it is securely adhered to the glass before attaching your device.
Step 4: Verify Safety & Clearance
- Visual Scan: Sit in your normal pilot position. Ensure the mount places the device in your peripheral vision but does not block your view of traffic or the runway environment.
- Control Clearance: Verify that the mount does not interfere with anything or blocking your view.
Step 5: Mount Your Device
- Tablet: Expand the spring-loaded bracket, place your iPad flush against the backplate, and gently release the bracket to grip the device.
Step 6: Maintenance
- Re-suction: Suction cups can lose pressure over time due to altitude and temperature changes. We recommend releasing and re-securing the mount before every flight.
Fly Safe and Enjoy Your Flight!
Disclaimer
The Pilot in Command is solely responsible for ensuring that all cockpit accessories are secured properly and do not interfere with the safe operation or visual requirements of the aircraft.
Aviator+ Yoke & Suction Cup Mount Set
Thank you for choosing the Aviator+ Mount Set. This kit is designed to provide maximum versatility in the cockpit, allowing you to mount your iPad to either the control yoke or the aircraft window.
⚠️ CRITICAL SAFETY WARNING
Before operating the aircraft, you must verify that the installed mount does not interfere with flight controls, block essential instruments, or obstruct your primary visual scan.
Step 1: Assembly
- Take your chosen Base (Yoke or Suction) and Device Holder.
- Align the connection point (threaded screw) of the arm with the receiver on the Holder.
- Secure the components together. Tighten the adjustment knob to ensure the holder does not droop, but leave it loose enough to make final angle adjustments once mounted.
Step 2: Installation (Choose A or B)
Option A: Yoke Installation
- Loosen the Clamp: Open the jaws of the Yoke Clamp widely.
- Position: Place the clamp around the shaft of the aircraft’s control yoke.
- Tighten: Secure the clamp knob until the mount is immovable on the shaft.
- CONTROL CHECK (Crucial):Move the yoke to full deflection in all directions (forward, aft, left, right).Ensure the mount does not hit the panel, your knees, or the windshield. Verify it does not block the view of the six-pack or engine gauges.
Option B: Suction Cup Installation
- Prepare Surface: Clean the window area with a glass cleaner or alcohol wipe and ensure it is completely dry.
- Attach: Ensure the lever is "Open" (Unlocked). Press the cup firmly against the glass.
- Lock: Push the lever sideways to the "Locked" position.
- Tug Test: Give the mount a firm tug to ensure a solid seal.
- VISUAL CHECK: Ensure the mount is positioned in your peripheral vision and does not block your view of traffic or the runway.
Step 3: Mount Your Device
- Expand the spring-loaded bracket, place your device flush against the backplate, and gently release the bracket to grip the corners/edges.
Step 4: Final Adjustments
- Viewing Angle: Loosen the adjustment knob slightly to rotate the device for the best viewing angle and glare reduction, then re-tighten.
- Tightness Check: Give the entire assembly one final shake to ensure all connections are secure before engine start.
Fly Safe and Enjoy Your Flight!
Disclaimer
The Pilot in Command is solely responsible for ensuring that all cockpit accessories are secured properly and do not interfere with the safe operation or visual requirements of the aircraft.
Ultra-Strong Magnetic Yoke Mount
Thank you for choosing the Ultra-Strong Magnetic Yoke Mount. Please read these instructions carefully to ensure a secure connection and safe flight operations.
⚠️ CRITICAL SAFETY WARNING
Before operating the aircraft, you must verify that this mount does not interfere with the full range of motion of the flight controls or obstruct the view of essential flight instruments.
Step 1: Assemble the Mount
- Locate the Yoke Arm and the Magnetic Holder.
- Align the threaded screw on the Yoke Arm with the receiver on the back of the Magnetic Holder.
- Screw the components together securely. Ensure the connection is tight so the holder does not rotate or vibrate loose during flight.
Step 2: Prepare Your Device
- Clean the Surface: Thoroughly clean the back of your iPad (or iPad case) where you intend to place the metal plate. Ensure it is dry and free of oil or dust. Note: For the strongest bond, apply the plate directly to the device or the outside of a hard case, not soft silicon or leather.
- Apply the Plate: Peel the backing off the Adhesive Metal Plate.
- Stick and Press: Center the plate on the back of your device and press firmly for 30 seconds to activate the adhesive. Tip: Allow the adhesive to cure for at least 15 minutes before first use to ensure maximum strength.
Step 3: Attach to the Control Yoke
- Loosen the clamp knob on the mount base to open the jaws.
- Position the clamp around the shaft of the aircraft’s control yoke.
- Tighten the clamp knob until the mount is immovable on the yoke shaft.
Step 4: Safety & Clearance Check (Crucial)
Before placing your device, perform a control check:
- Full Deflection: Move the yoke to its limits (Full Forward, Aft, Left, Right). Ensure the mount does not hit the panel, knees, or windshield.
- Visibility: Ensure the mount position does not block your view of primary flight instruments or engine gauges.
Step 5: Mount Your iPad
- Simply place the metal plate on the back of your iPad against the Magnetic Holder.
- Confirm the Hold: The magnets will snap the device into place. Give the device a gentle tug to ensure the magnetic connection is solid and ready for turbulence.
- Adjust the angle of the arm for the best viewing position.
Fly Safe and Enjoy Your Flight!
Disclaimer
The Pilot in Command is solely responsible for ensuring that all cockpit accessories are secured properly and do not interfere with the safe operation of the aircraft. Magnetic mounts should be tested to ensure they can hold the specific weight of your device in turbulent conditions.
TechSierra Kneeboard Mount
Thank you for choosing the TechSierra Kneeboard Mount. Please read these instructions carefully to ensure a secure fit and comfortable operation during your flight.
⚠️ CRITICAL SAFETY WARNING
Before flight, verify that the kneeboard does not interfere with the full range of motion of the flight controls (specifically full aft yoke/stick deflection) or obstruct access to the throttle quadrant, flap levers, or gear handle.
Step 1: Assemble the Holder
- Locate the Tablet Holder and the 4-Pin Bracket.
- Align the 4 pins on the bracket with the corresponding slots on the back of the Tablet Holder.
- Lock it in place. Press the bracket in and slide or click it firmly to ensure a secure connection to the holder.
Step 2: Connect to the Strap
- Locate the Leg Strap assembly.
- Identify the mounting connector on the center of the strap.
- Slide the assembled Tablet Holder onto the strap connector until it locks into position. Ensure the orientation allows for your preferred viewing angle (portrait or landscape)
Step 3: Secure to Your Leg
- Sit in your normal pilot position.
- Place the strap assembly on your thigh (left or right leg, depending on preference and cockpit layout).
- Wrap the strap around your leg.
- Pull the strap tight enough to prevent the mount from sliding during turbulence, but loose enough to maintain comfort and circulation.
- Secure the Velcro firmly to lock the strap in place.
Step 4: Mount Your iPad
- Expand the spring-loaded grips on the Tablet Holder.
- Place your iPad into the holder, ensuring it sits flat against the backplate.
- Gently release the grips so they secure the device corners or edges.
- Confirm the screen orientation is correct for your use.
Step 5: Pre-Flight Control Check (Crucial)
Before starting the engine, perform a control sweep:
- Full Aft Check: Pull the yoke or stick fully back (into your lap). Ensure it does not hit the kneeboard or iPad. This is critical for flare and stall recovery safety.
- Side-to-Side: Move the controls full left and right to ensure your arm or the kneeboard doesn't restrict movement.
Fly Safe and Enjoy Your Flight!
Disclaimer
The Pilot in Command is solely responsible for ensuring that all cockpit accessories are secured properly and do not interfere with the safe operation of the aircraft.
Cooling + Charging Yoke Mount for Phones
Thank you for choosing the ProAviator Cooling & Charging Mount. This mount is designed to keep your device cool during long flights.
⚠️ CRITICAL SAFETY WARNING
Before operating the aircraft, you must verify that the mount AND the power cable do not interfere with the full range of motion of the flight controls. Loose cables can be a serious hazard.
Step 1: Assemble the Mount
- Locate the Yoke Arm and the Cooling Phone Holder.
- Align the threaded screw on the Yoke Arm with the receiver on the back of the Holder.
- Screw the components together. Ensure the connection is tight so the holder stays in position during turbulence.
Step 2: Attach to the Control Yoke
- Loosen the clamp knob on the mount base to open the jaws.
- Position the clamp around the shaft of the aircraft’s control yoke.
- Tighten the clamp knob until the mount is firmly attached and does not rotate.
Step 3: Power & Cable Management (Crucial)
- Connect the Cable: Plug the included USB charging cable into the input port on the bottom or back of the holder.
- Connect to Power: Plug the other end into your aircraft's USB port or an external battery pack.
- Route the Cable Safely: Secure the loose cable. WARNING: Ensure the cable has enough slack to allow the yoke to move fully forward/aft/left/right, but not so much slack that it can get tangled in the yoke shaft, throttle quadrant, or rudder pedals.
Step 4: Safety & Clearance Check
Perform a full control sweep before inserting your device:
- Full Deflection: Move the yoke to all limits. Watch the cable closely to ensure it does not snag or pull tight.
- Instrument Visibility: Ensure the mount and cable do not block your view of essential gauges.
Step 5: Mount Your Phone
- Expand the bracket on the Cooling Holder.
- Insert your phone, ensuring the back of the phone makes contact with the cooling surface.
- Verify Cooling/Charging: Once powered, the cooling fan/plate should activate.
Fly Cool and Safe!
Disclaimer
The Pilot in Command is solely responsible for ensuring that all cockpit accessories and cables are secured properly and do not interfere with the safe operation of the aircraft.
Starlink Mini Suction Cup Mount
⚠️ CRITICAL SAFETY WARNING
The Pilot in Command is solely responsible for ensuring that all cockpit accessories are secured properly and do not interfere with the safe operation of the aircraft.
In the event of turbulence or a hard landing, a detached mount can become a dangerous projectile inside the cockpit or cabin. Use at Your Own Risk: The user assumes all liability for use in any aircraft.
Assembly Instructions:
1. Install the Suction Brackets
Slide the four suction cup brackets into the corners of the mounting frame. As shown in the picture, direction matter: pay close attention to the part with the "FlightPro" logo. Ensure the brackets are oriented exactly as indicated to fit the frame correctly.
2. Clean the Mounting Surface
Using a clean cloth or wipe, thoroughly clean the glass surface where you intend to mount the Starlink Mini (e.g., a car sunroof or window).
- Tip: Ensure the glass is completely dry and free of dust or grease so the high-strength suction cups can form a proper vacuum seal.
3. Position and Press
Align the mount against the cleaned glass surface. Press the entire unit firmly against the glass to flatten the suction cups and expel the initial air underneath them.
4. Lock the Suction Cups
While maintaining pressure against the glass, locate the locking lever or latch on each suction cup. Press these levers down (in the direction of the blue arrows shown in the diagrams) until they click or lock into place.
- Check: Give the mount a gentle tug to verify that all four cups have a firm grip on the surface.
- Re-suction: Suction cups can lose pressure over time due to altitude and temperature changes. We recommend releasing and re-securing the mount before every flight.
5. Connect to Power
Insert the Starlink Mini power cable into the unit's power port. Then, connect the other end of the cable to your portable power source (such as a power bank or portable power station) to boot up the system.
Disclaimer
The Pilot in Command is solely responsible for ensuring that all cockpit accessories are secured properly and do not interfere with the safe operation of the aircraft.
Upgrade Your Cockpit: Total Versatility for Every Flight
If you already own a ProAviator or Aviator+ system, you don’t need a whole new kit to change your view. Our modular design allows you to swap mounting bases in seconds, giving you the ultimate flexibility in how you fly.
-
Model: ProAviator | Yoke Clamp
Regular price $26.00 USDRegular priceUnit price per -
Model: ProAviator | Suction Cup
Regular price $23.00 USDRegular priceUnit price per -
Model: ProAviatorXL | Yoke Clamp
Regular price $36.00 USDRegular priceUnit price per -
Model: ProAviator | Kneeboard Strap
Regular price $21.00 USDRegular priceUnit price per -
Model: ProAviator | Fixed Base
Regular price $17.00 USDRegular priceUnit price per


Can't find what you need? We're here to help!
⚠️ Important Safety Disclaimer
Please Read Before Use:
FlightPro's products are designed as portable cockpit accessories and are not certified aircraft parts.
The Pilot in Command (PIC) is solely responsible for ensuring that the installation and use of these devices do not interfere with the safe operation of the aircraft. This includes, but is not limited to:
- Ensuring full and unrestricted movement of all flight controls (yoke, stick, rudder, throttle).
- maintaining a clear view of all primary flight instruments and engine gauges.
- Ensuring the device does not obstruct the pilot’s primary visual scan outside the aircraft.
Always perform a pre-flight control sweep and safety check after installing any accessory. If the mount cannot be secured without interfering with aircraft operations, do not use it.